Create a content type
To understand what are content types, read this page.
Define your needs
The first thing to consider is: do you need a new Doctrine entity class? It really depends if you need more fields that can't be covered by the JSON custom fields.
As an example, we'll want to create a portfolio with photo galleries, but we also want our blog with standard articles, unrelated to the galleries.
In this case, our gallery can be a simple [gallery] shortcode placed inside the editor: no need to create an entity as we already have everything.
So we need to create:
- A page named
Portfoliowhich will be our paginated galleries archive - A content type
photo_gallery
Register a new content type
To register our new content type, create a new file src/EventSubscriber/ContentTypeRegistrationEventSubscriber.php:
namespace App\EventSubscriber;

use NumberNine\Entity\Post;
use NumberNine\Event\ContentTypeRegistrationEvent;
use NumberNine\Model\Content\ContentType;
use Symfony\Component\EventDispatcher\EventSubscriberInterface;

final class ContentTypeRegistrationEventSubscriber implements EventSubscriberInterface
{
    public static function getSubscribedEvents(): array
    {
        return [
            ContentTypeRegistrationEvent::class => 'register'
        ];
    }

    public function register(ContentTypeRegistrationEvent $event): void
    {
        $event->addContentType(
            new ContentType(
                [
                    'name' => 'photo_gallery',
                    'entity_class_name' => Post::class,
                    'permalink' => '/photo-gallery/{slug}',
                    'icon' => 'mdi-folder-multiple-image',
                ]
            )
        );
    }
}
TIP
To create a content type based on a custom Doctrine entity class, you'll need to:
- Make your entity extend
\NumberNine\Entity\ContentEntityand remove theidcolumn if it's beed added bymake:entity - Make your repository extend
\NumberNine\Repository\AbstractContentEntityRepository
Assign capabilities to roles
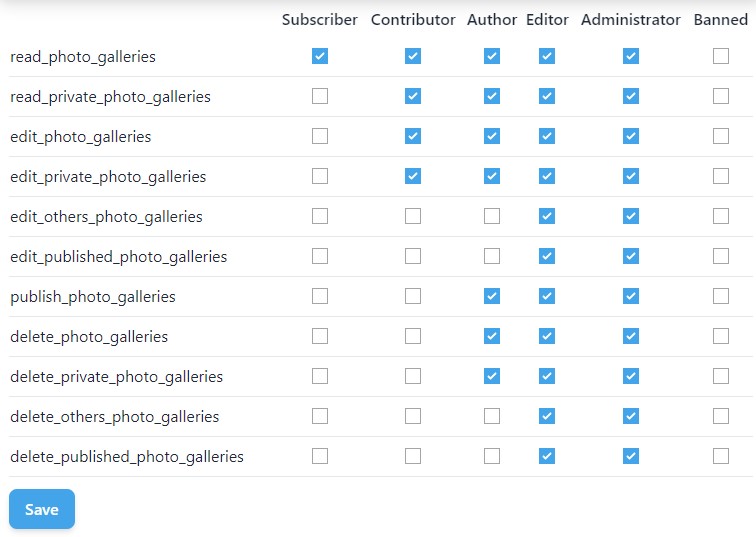
When you register a new content type, some capababilities are automatically generated.
To be able to edit a page, you'll have to go to the administration panel under Users > Roles and assign them to your roles. In our example, they're the ones that end by _photo_galleries.
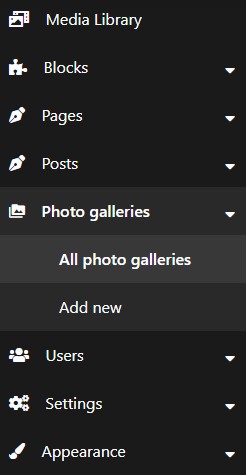
At this point, you'll be able to create new photo galleries, as new menu items appeared.
Create the template for a single entity
By default, the template used by our new content type is content/single.html.twig.
Let's make a specific template. Create a file in templates/theme/photo_gallery/single.html.twig:
{% extends N9_base_template() %}

{% block body %}
<div class="container standard-container">
    <main class="page-main">
        <h1 class="text-5xl font-thin mb-5">{{ entity.title }}</h1>
        <div>This photo gallery was created on {{ entity.createdAt | date }}</div>
        <div>{{ entity.content }}</div>
    </main>
</div>
{% endblock %}
Done! All photo galleries will now be displayed using this template.
You can even override this template for a particular gallery by creating:
templates/theme/photo_gallery/single_your-gallery-slug.html.twigtemplates/theme/photo_gallery/single_125.html.twig(change125with the ID)
Create the template of the index page
Now we need an index page listing all our galleries, just like a blog feed.
It will have a page content type but will a specific template.
First, let's create the template. Our template will be a list of entities, so it have to be a index.html.twig file for NumberNine to know it needs a paginated collection.
Create a file templates/theme/photo_gallery/index.html.twig:
{% extends N9_base_template() %}

{% block body %}
<div class="container standard-container">
    <div class="grid grid-cols-4 gap-5 w-full">
        <main class="blog-main col-span-3">
            {% for photo_gallery in entities %}
                <a href="{{ N9_entity_url(photo_gallery) }}">
                    <h2 class="text-xl font-bold mb-5">{{ photo_gallery.title }}</h2>
                </a>
            {% endfor %}
            {{ N9_shortcode('[pagination]') }}
        </main>
        <aside class="blog-sidebar">
            {{ N9_area('blog_sidebar') }}
        </aside>
    </div>
</div>
{% endblock %}
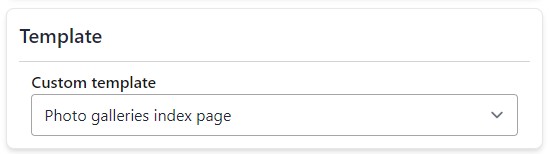
You're almost done. In the administration panel, click Pages > Add new then go the the Classic Editor.
On the right sidebar, choose from the template list "Photo galleries index page" that now appears as your template exists.
Set status to Publish and save the page.
Done! Visit your page to see the paginated list of galleries.
Add new tabs to the admin classic editor
Defining extension fields
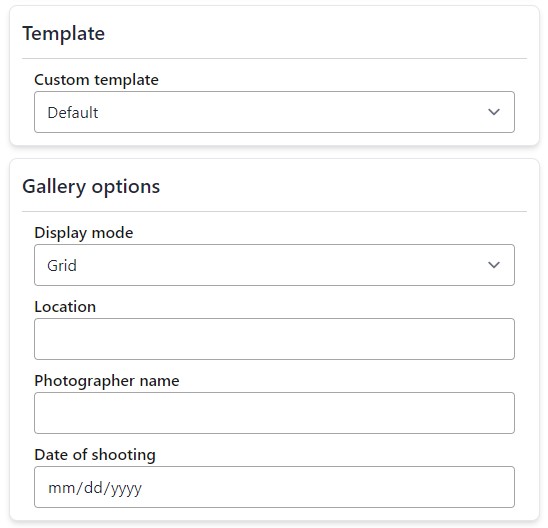
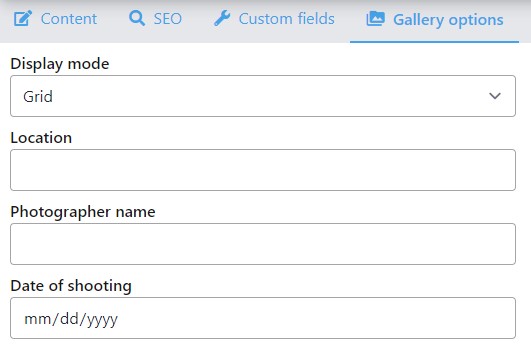
Your new content type may come with some fields that you'd like to let the user define. As an example, our photo_gallery content type could add these new custom fields:
- Display type: a select control to choose among
GridandMasonry - Location: a text input control
- Photographer name: a text input control
- Date of shooting: a calendar control
First, let's create our custom form type. It's a regular Symfony form type. Create a file src/Form/PhotoGalleryType.php and copy the code below.
Make it extend EditorExtensionType, which will better integrate in the new tab visually, without label and extra padding.
namespace App\Form;

use NumberNine\Form\Type\EditorExtensionType;
use Symfony\Component\Form\AbstractType;
use Symfony\Component\Form\Extension\Core\Type\ChoiceType;
use Symfony\Component\Form\Extension\Core\Type\DateType;
use Symfony\Component\Form\FormBuilderInterface;

class PhotoGalleryType extends AbstractType
{
    public function buildForm(FormBuilderInterface $builder, array $options): void
    {
        $builder
            ->add('display_mode', ChoiceType::class, [
                'choices' => [
                    'Grid' => 'grid',
                    'Masonry' => 'masonry',
                ],
            ])
            ->add('location', null, ['required' => false])
            ->add('photographer_name', null, ['required' => false])
            ->add('date_of_shooting', DateType::class, [
                'widget' => 'single_text',
                'input' => 'string',
                'input_format' => 'Y-m-d',
                'required' => false,
            ])
        ;
    }

    public function getParent(): string
    {
        return EditorExtensionType::class;
    }
}
Then we need to embed it. Create a class in src/EditorExtension/PhotoGalleryEditorExtension.php.
namespace App\Content\EditorForm;

use App\Form\PhotoGalleryType;
use NumberNine\Model\Content\EditorExtensionBuilderInterface;
use NumberNine\Model\Content\EditorExtensionInterface;

final class PhotoGalleryEditorExtension implements EditorExtensionInterface
{
    public function build(EditorExtensionBuilderInterface $builder): void
    {
        $builder
            ->add(
                'gallery_options',
                PhotoGalleryType::class,
                ['icon' => 'mdi-folder-multiple-image'],
            )
        ;
    }
}
TIP
The namespace of your extension is not important, you can place this class wherever you want.
Finally, modify src/EventSubscriber/ContentTypeRegistrationEventSubscriber.php to add the reference to this extension class:
use App\EditorExtension\PhotoGalleryEditorExtension;

// ...

public function register(ContentTypeRegistrationEvent $event): void
{
    $event->addContentType(
        new ContentType(
            [
                // ...
                'editor_extension' => PhotoGalleryEditorExtension::class,
            ]
        )
    );
}
Done! As a result, your admin now looks like this:
Using extension fields
Once your data is saved, it's transformed into custom fields. They're stored with this format: extension.name_of_the_tab.name_of_the_field.
In our example, we can display the date of shooting with:
{{ entity.getCustomField('extension.gallery_options.date_of_shooting') }}
Or we can retrieve all fields of this extension with:
{% set fields = entity.getCustomFieldsStartingWith('extension.gallery_options.') %}
Add new sidebar components to the admin classic editor
Alternatively, you could want a sidebar card instead of a tab.
Simple, just modify your src/EditorExtension/PhotoGalleryEditorExtension.php file like this:
final class PhotoGalleryEditorExtension implements EditorExtensionInterface
{
    public function build(EditorExtensionBuilderInterface $builder): void
    {
        $builder
            ->add(
                'gallery_options',
                PhotoGalleryType::class,
                ['icon' => 'mdi-folder-multiple-image'],
                EditorExtensionBuilderInterface::COMPONENT_TYPE_SIDEBAR,
            )
        ;
    }
}
Done! Check it out: